By Allen Parker (Parkstone)
1 The Banana and Wafer Cannons SWAN 14 (1995)
Introduction
The title is intended to signify beginners in the use of cannons, and it is thus of interest to novices, many experienced high bisquers, and, I suspect, not a few middle bisquers. In his book entitled Modern Croquet Tactics (first published in 1905) C.D.Locock devotes a whole chapter of twenty pages to the subject of cannons, including no less than sixteen 3-ball corner cannons. In my experience it is not necessary to learn more than four or five cannons to cover most situations, particularly as many opportunities for the use of a cannon arise elsewhere than in a corner. This is not to say that Locock was exaggerating the value of cannons. Most certainly not.
Many players experienced in other departments of the game but not familiar with cannons are somewhat embarrassed or confused when they find themselves with three balls in contact on the yard line. But the enthusiastic exponent of the cannon knows that a 3-ball cannon means at the least a good rush to his hoop, and often a good chance of a 3-ball break, and that a 4-ball cannon means an automatic 4-ball break. The reason is embodied in Law 19(b) dealing with groups of three or four balls in mutual contact (at least one of which must be a yard line ball). In this situation all the balls except the roqueted ball become balls in hand and, with a 3-ball group, may be placed in any position in contact with the roqueted ball (but not in contact with one another).
The Banana Cannon
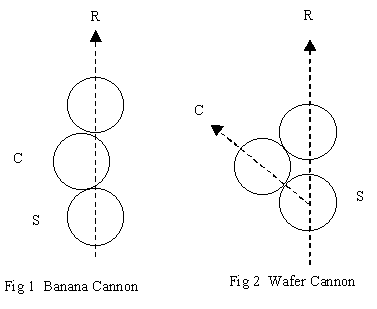
There is one cannon that most players learn to use early in their croquet career. This is the so-called banana cannon, illustrated in Figure 1. Certainly there are occasions when this is the cannon to use, as we shall see, but more often than not it is better to employ the wafer cannon. Before going on to deal with the latter, it will be as well to say a few words about the placing of the balls for the banana cannon.

In Figure 1 the ball marked S is the strikers ball, C is the ball from which he is taking croquet and the third ball is placed in contact with the croqueted ball so that the edge of the croqueted ball projects over the line joining the centres of the other two balls (the dashed line in the figure). The object of the stroke is to get a rush on the third ball and this is achieved by aiming straight at the third ball and giving a gentle tap. The centre ball should fall to one side, leaving a rush along the line R with the balls not more than a foot apart. The important thing is the projection of the edge of ball C over the line of R. If it does not project then on tricky ground, e.g. near a corner spot, one of the balls may roll back or sideways and spoil the rush. Even with this precaution the balls may sometimes roll off line on bad ground, and this is one (but by no means the only) reason for using the wafer cannon.
The Wafer Cannon
This is illustrated in Figure 2. The third ball is still placed on the rush line R, but now it is almost touching the strikers ball, the gap between the two being wafer thin, say one sixteenth of an inch.
This gap can be varied to suit circumstances as you get more experienced, but if a rush is all that is required then the gap should be kept as small as possible without the balls touching. They must both be in contact with the croqueted ball C, and some care is required in placing the balls, especially on rough ground. Now comes the execution of the stroke. Aim along the rush line R and treat it as a normal rush, but with extra power because the croqueted ball C will also be moved some yards and this takes some of the sting out of the rush. There are several advantages over the banana cannon. Firstly the whole thing is done in one shot, so there is no question of balls rolling back and spoiling the rush. Secondly the croqueted ball can be made to move a considerable distance: it can often be moved to a particularly advantageous position, but at the very least the wafer cannon gives an easy rush to the hoop and gets the croqueted ball into court.
What are the disadvantages? The main problem is to ensure that the croqueted ball does not go off the boundary. Look at Figure 3. In the right hand part of the figure a wafer cannon is used to rush a ball to Hoop 3 and in the same shot to move the croqueted ball towards Hoop 4, thus getting a 3-ball break.
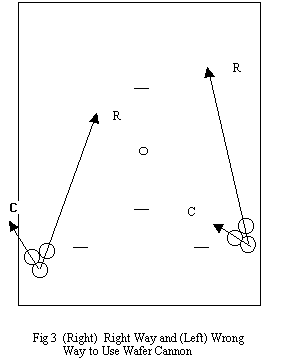
In the left hand part of Figure 3 an attempt is made to use a wafer cannon to rush a ball to Hoop 6. Inevitably the croqueted ball will be driven over the boundary, and the turn will end. When the balls are in or near a corner like this it will be found impossible to get a rush diagonally out into court without the croqueted ball going off. To get the rush in this situation the banana cannon (or no cannon at all) has to be used. Remember, in the wafer cannon the croqueted ball must not go over the boundary, but either of the other balls can because they have been involved in a rush, albeit in a rush performed in the same stroke as a croquet stroke.
Conclusion
You do not have to wait for a cannon to appear. You will find many opportunities for deliberately creating one. For example, when you take off to your opponents balls joined up on the boundary within a foot or so of one another, if your take-off is a good one, and you land within a couple of feet of the balls, try to cut it behind the other ball so that it comes back on the yard line in contact, and you have your cannon.
As in all other aspects of the game, practice makes perfect, so if you have never played a wafer cannon before, try it out repeatedly in practice before using it in a game.
2 Six Cannons for the Price of One SWAN 15 (1996)
The wafer cannon dealt with in a previous article is the most important because it can be used anywhere on the yardline and is the easiest to learn. The cannon dealt with in this article is the second easiest to learn. With minor modification it can be employed in six common situations so that the opportunities for its application are sufficiently frequent to make the time involved in perfecting it worth while. Lets start in Corner 1 where you have three balls in contact and you are for Hoop 1. The object of the stroke is to croquet one ball to Hoop 2 and in the same stroke rush the other to Hoop 1, thus getting a 3-ball break.
First Corner Cannon (for Hoop 1)
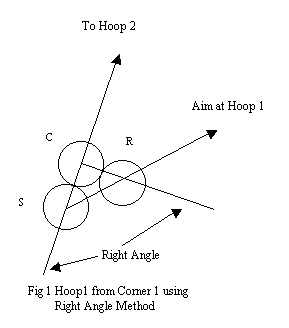
The strikers ball (marked S in Figure 1) is placed in contact with the croqueted ball (marked C) so that the line joining the centres of S and C points slightly to the left (about 1-2 yards) of Hoop 2. The ball to be rushed (marked R) is then placed in contact with ball C in such a way that the line joining the centres of R and C is at right angles to the line joining the centres of C AND S. The point of aim will depend on exactly how you intend to play the stroke, and it is here that you need to go on a court and experiment until you find the method that suits you best. For guidance the point of aim will lie somewhere between Hoop 1 and Hoop 6. With a full stop shot hard enough to send the croqueted ball to Hoop 2, you should try aiming at Hoop1. If you find the rushed ball goes too far beyond Hoop 1, try aiming at the peg, or if necessary at Hoop 6. You will probably find, as I do, that with a stop shot you need to aim at or near Hoop1, but with a drive you need to aim near Hoop 6. Having decided which is the best method for YOU, practise it until you can produce a good 3-ball break situation every time. Of course the strength required to get the croqueted ball to Hoop 2 will vary with the speed of the lawn, but if you can get this ball right, the other ball will be right, or nearly so.
Obviously the identical cannon can be used when the balls are in Corner 3 and you are for Hoop 3, and further, by simply changing the ball arrangement from right-handed to left-handed, the same cannon can be used to make 1-back from Corner 2 or 3-back from Corner 4.
Second Corner Cannon (for Hoop 2)
By slight modification the same cannon can be made to give a reasonable chance of a break from Corner 2 when you are for Hoop 2, or from Corner 1 when you are for 2-back. Look at Figure 2. This shows the right angle cannon already described, placed to make Hoop 1 from Corner 1, and the same cannon with the balls in Corner 2.The ball placement is identical for both cannons. The line marked C represents the direction in which the croqueted ball is pointed (1-2 yards to the side of the next hoop but one), and the line marked A is the recommended direction of aim (directly at Hoop 2 for the cannon from Corner 2). The only difference between the two cannons is that from Corner 1 the stroke is a stop shot (or possibly drive), while from Corner 2 it is a part roll. Again you must go on to the court and experiment to find the best stroke for YOU. You should now aim always at Hoop 2 and adjust the amount of roll and the strength of the shot to send the croqueted ball to Hoop 3, and rush the other ball to Hoop 2.
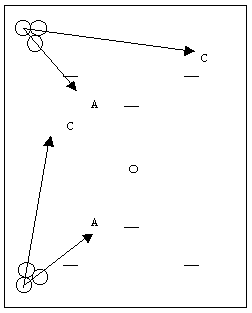
Figure 2 - (Bottom) Hoop 1 from Corner 1: (Top) Hoop
2 from Corner 2
Conclusion
Remember, for both variations of the cannon you should experiment with the amount of roll or stop and the direction of aim as described. It is experimenting with shots that can make practice more interesting.
You do not have to wait until a cannon appears. You can often deliberately create one, either by rushing a ball into a corner that already contains a corner ball, or by taking off to a pair of balls in a corner and roqueting one of them carefully so that they both end up in the corner.
3 The Halfpenny Cannon SWAN 16 (1997)
Hoop 4 from Corner 4 (and 4-back from Corner 3)
Of the cannons to make each of the eight corner hoops from their respective corners, six were described in Part 2 of this series (SWAN April 1996, page 18). The remaining two corner hoops, viz. Hoop 4 from Corner 4, and 4-back from Corner 3, may both be made by the cannon described here, viz., the Halfpenny Cannon. In the six corner cannons previously described, the croqueted ball was sent to the next-hoop-but-one and the rushed ball was sent to the next hoop. In the Halfpenny Cannon the reverse is the case.
The Halfpenny Cannon
The placement of the balls to make Hoop 4 from Corner 4 is shown in Figure 1, in which the strikers ball is marked S, the croqueted ball C and the rushed ball R. The balls are shown greatly enlarged relative to the size of the hoop and the dimensions of the corner of the court, in order to indicate the details of the placement. The balls S and R are adjusted as though to rush R to a point about 1-2 yards to the right of Hoop 4, with the gap between S and R equal to 10mm (3/8 inch), i.e. equal to one half of the diameter of a new penny. The size of the gap is important, and a penny should be used in practice to get this right. (In a game the gap must be estimated by ocular test alone, as the laws do not allow the use of measuring aids.) If the gap has been adjusted correctly, it will be found that the line between the centres of the balls S and C will point slightly into court, say at a point about 3 yards up the west boundary.
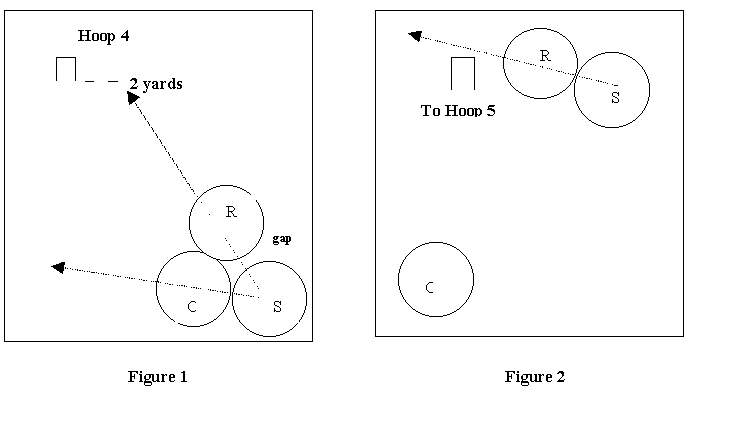
The shot is played directly at ball R with a drive (flat mallet), hard
enough to send ball R to just beyond and to the right of Hoop 4. The croqueted
ball C will then end up near the yard line behind Hoop 4. The strikers
ball S is now in hand and takes croquet from ball R (See Figure 2) with
a little stop shot that sends ball R to Hoop 5 and itself takes position
in front of Hoop 4. The striker then runs the hoop firmly to ball C and
has a 3-ball break.
The difficult shot for the beginner is the stop shot hoop approach. It is difficult only because it is not normally practised. Thus if you want to use this cannon in earnest, you must practise not only the cannon itself, but the stop shot approach from various positions to the right of Hoop 4.
The application of the Halfpenny Cannon to make 4-back from Corner 3 needs little further explanation. The rushed ball is now directed 1-2 yards to the LEFT of 4-back and. With gap adjusted, the croqueted ball will point a little way down from Corner 2. After playing the cannon shot, 4-back is approached with a little stop shot sending ball R to penult, and the hoop is run firmly to ball C.
As with all shots, practice makes perfect, and this applies particularly to the two cannons described in this article. It can be fun practising them, and you may find that the Halfpenny Cannon is not as difficult as you first thought.
Four Ball Cannons SWAN 17 (1998)
Although 4-ball cannons seem at first sight to be rather complicated, it is easier to get a 4-ball break from a 4-ball cannon than from a 3-ball.
4-ball cannons are not as difficult to set up and execute once you have grasped their principle. I shall illustrate two and leave you to work out the others. However, the warning that attempts to get a 4-ball break from a corner situated diagonally opposite to the hoop required (e.g. Hoop 3 from Corner 1), whilst although theoretically possible, are likely to result in a broken mallet.
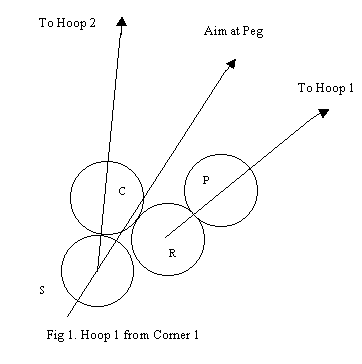
Hoop 1 from Corner 1 (Figure 1)
The principle is illustrated in Figure 1, in which the strikers ball is marked S, the croqueted ball is marked C, the ball to be rushed is marked R and the ball to be promoted is marked P.
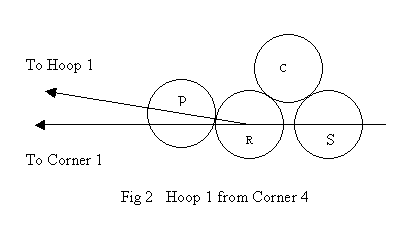
Hoop 1 from Corner 4 (Figure 2)
First set up the wafer cannon with a rush along the south boundary.
Then place P in contact with the ball to be rushed, R, so that the line
R-P points to Hoop 1. Now play the shot as though you were rushing ball
R along the south boundary, but hard enough to send ball P to Hoop 1. R
will be driven off the south boundary close to Corner 4. This leaves a
simple croquet shot to send the ball R to Hoop 2 and going to P at Hoop
1. The originally croqueted ball C will end up somewhere beyond Hoop 4.
Creating 4-ball Cannons
One way of getting a 4-ball cannon is to rush your partner ball into a corner that is already occupied by both enemy balls. A 4-ball cannon may also arise at the start of the game when both players shoot both balls into Corner 4.
5 3-Ball Promotion Cannon (written for 1999 SWAN)
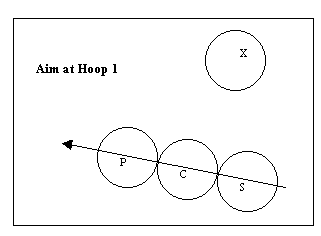
The promotion of a ball in a 4-ball cannon was described in the 4th article. However, the situation with four balls close together on the boundary is more likely to give rise to, or allow you to create, a 3-ball promotion cannon. The arrangement of this is shown in the figure, in which S is the strikers ball, C the croqueted ball, P the ball to be promoted, and X the fourth ball nearby.
Suppose, at the start of a handicap game, that your low bisque opponent, playing second, has shot at you with both balls and has missed with both shots, so that on the fifth turn of the game you step on to the court with all four balls lined up close together on the east boundary near corner 4. You then contrive to roquet one of the balls gently behind another so as to obtain a 3-ball cannon. You then arrange the balls in an approximate line with C P pointing to Hoop 1.
If you now play a full stop shot, the promoted ball, P, will be driven to Hoop 1 WITHOUT BEING ROQUETED, and your ball, S, will stop a few yards from the boundary. You now turn round and shoot at the remaining ball, X. You are then left with the split roll, sending ball X to hoop 2 and going to ball P, which is waiting at Hoop 1. The original croqueted ball, C, ends up somewhere near hoop 4.
Certainly the manuvre is more difficult than the cannons I have described previously, firstly because you have to do a stop shot good enough to send ball P to Hoop1 while remaining within hitting distance of the ball X on the boundary (of course if you have bisques there is no danger), and secondly because you have to do the big split roll to hoops 1 and 2. It is well worth practising, even by relatively high bisquers, because after all it is better to live dangerously and have an exciting game.
Incidently, if you win the toss and put your low bisque opponent in
first, and he goes in corner 4 with his first ball, you join him a yard
wide with your first ball, tempting him to shoot at you with his second.
If he misses, you join the three balls with your fourth ball, take a bisque
and carry out the promotion cannon as described above.