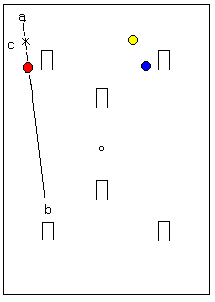
Figure 1 The Rush Line
What is the Rush Line?
In figure 1 with Red in the position shown, suppose that Blue wishes to rush Red to 2-back. Then the dotted line a-b is the rush line. The stroke immediately preceding the rush (i.e. a take off or split shot) should, if possible, be played from a point on or near the rush line. For example, if Blue wished to take off to the point x for his rush on Red for 2-back, he will probably get a better rush if he takes off from point a, on the rush line, then if he takes off from point c, situated to one side.
Figure 1 The Rush Line
The reason is of course that the direction of the striker's ball in a take off can be determined much more accurately than the strength. With a take off from point a, a straight rush will automatically be obtained, provided that the stroke is not played much too hard, whereas a high degree of accuracy in strength is needed to get a straight rush with a take off from point c.
Rushing to the Rush Line
At this point Blue may well ask What is the point of telling me that I ought to be on the rush line when I happen to find myself elsewhere? The reply is Get a rush to the rush line. Blue may then demur I have a rush on Yellow to the middle of the North boundary (See Figure 1).
This is nowhere near your rush line, and if I try to cut rush, I shall be most unlikely to judge the right strength to land on the rush line. The reply to this is Use the boundaries. Cut rush Yellow to somewhere near point a. Hit as hard as you can. Yellow may go miles beyond point a, but it will be replaced on the yard line and you will find it near the rush line.
Getting a Rush to the Rush Line
When a rush to the rush line is not ready made, it must be obtained by a previous take-off, or another rush, or by running a hoop, or possibly by all three combined. Look at Figure 2. Blue has just made the Rover and intends to peg Yellow out. In his approach to Rover he has placed Black to the East of the hoop so as to get a rush back to the East of Red as shown in Figure 2.
He plays this rush. He then takes off along Reds rush line and rushes Red to the boundary near point R, which is situated on the rush line from Yellow to the peg. A take-off along this rush line gives him his rush to the peg. An alternative would be to approach and run Rover so as to rush Black directly to point R. The choice will depend on where you wish to leave the balls after the peg-out.

Figure 2 Using Hoop Point, Rush ond Take-off to get on the Rush Line.
Application to Break Play
The use of the boundaries to get on the rush line may be illustrated by some typical situations arising in a 3-ball or 4-ball break. Look as Figure 3 in which the balls are not shown and only some possible positions of Red are indicated. Blue has just made Hoop 3 off Black and croquets Black to Hoop 5 while going to the pivot ball Yellow. If Red, the pioneer for Hoop 4, is perfectly placed just in front of the hoop, there is no problem - a simple take off to Red is adequate. Let us assume, however, that Red is badly placed. If Red is situated at p, q, or r, then Blue should attempt to get a rush on Yellow off the boundary at p1, q1 or r1 respectively, so that in the following split shot, Blue will in each case travel along the rush line of Red to Hoop 4.
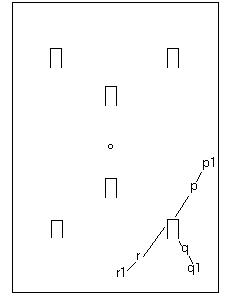
Figure 3 Using the Boundaries
The Straight Stop Shot
There are occasions when the application of the rush line principle
is not the best solution to the problem. This is the case when the croqueted
ball has to be sent in a direction difficult to achieve from any accessible
point on the rush line. For example in Figure 1, if Blue wished to send
Yellow to a position in front of Hoop 3 in the stroke which gave him his
rush on Red to 2-back, this would be impossible to achieve from point a,
but could be done with a straight stop shot from point c.