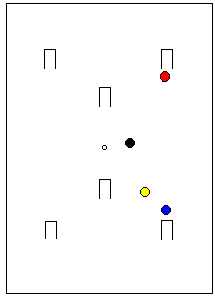
Figure 1

Figure 2
by Allen Parker (Parkstone)
There is a saying that the mark of a first class player is not how he plays the break, but how he ends it. One way of ending it is to wire the opponent's balls either from each other or from one's own balls. In advanced play the question of wiring is complicated by the lift, and for the present purpose we shall assume that you are a middle bisquer playing a handicap game and in receipt of enough bisques to pick up and play a controlled 4-ball break. Or you may be a high bisquer with even more bisques and the initiative to do likewise.
Now the first rule of successful wiring is indeed to make a break. The reason for this is obvious - a break gives you more strokes to accomplish your wiring scheme. It follows that you should not leave all your wiring till the end of the break, i.e. you should not finish the break and then, as an afterthought, start to think about wiring. The thinking should begin several points before the end of the break. The second rule is, accordingly: Think of your wiring scheme in good time. At the end of a controlled 4-ball break the making of two points will often be sufficient for the wiring scheme and we shall therefore describe the end of the break only. We shall choose a scheme that involves the minimum interference with the normal course of the break, and hence very little increase in the probability of your breaking down. The aim of the scheme is to end up with the opponent's balls DOUBLE wired across the last two hoops that you make, viz 4-back and Penult. This will demonstrate the general principles and when you have grasped these you will be prepared to work out slightly more difficult schemes like cross wiring at a hoop, or even cross pegging.
We take up the narrative at the point where Blue has just run 3-back with a perfect 4-ball break ahead of him, i.e. with the position illustrated in Fig.1. Blue then rushes Yellow short of Black and croquets him to Penult, with a rush on Black to Red. He sends Black to the left and slightly ahead of 4-back and roquets Red into a good position for the hoop. (As in every break, these little easy shots should be made with great care.) In approaching the hoop he places Red a foot or two North East of the hoop and wired from Penult. The position at this stage is illustrated in Fig. 2.
Figure 1
Figure 2
After running 4-back, Blue roquets Red gently, if necessary using the take-off to Black to adjust the position of Red to the perfectly wired position, where he is destined to remain. In the little take-off Blue obtains a rush on Black to just short of Yellow and croquets him to a point south of Penult.
He roquets Yellow and in approaching Penult he sends Yellow past the West side of the hoop to a point wired from 4-back and Red. The positions at this stage are shown in Fig. 3. After running Penult Blue has two more shots with which to adjust the position of Yellow, i.e. the roquet and the take-off to Black. What he must NOT do is to return to Red to adjust its position. Red's position was fixed some time ago, and if it does not lend itself to a double wire, then the wiring must be completed behind one of the hoops only. A second journey to Red can result in failure. The journey is comparatively long, and there is the danger of entanglement with the wires on both the out and return journeys, and it would be more difficult to obtain an accurate rush on Black in the take-off from Red.
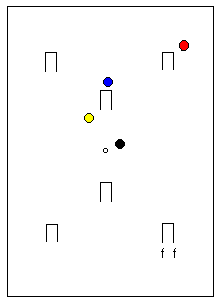
Figure 3
Thus Blue takes off from Yellow to get a good rush on Black to behind Hoop 4. (Since the take-off is at right-angles to the wiring line, Yellow will still remain wired even if it moves appreciably during the take-off.) The final two shots are used to send Blue and Black to the positions indicated by the letters ff in Fig.3, in which Black has a dolly rush to Hoop 1, and only one ball is open to Red or Yellow.
A shot by Red or Yellow will end up behind Hoop 4 where it can be picked up after making Hoop 4. In playing the second break, Black has only one really difficult shot, i.e. the rush to Hoop 2 after making Hoop 1, but since we assume that he has a bisque or two left, he should have no difficulty in rolling up to Hoop 2, laying a rush and taking a bisque. He then has a ball waiting at Hoop 3 since Yellow was almost certainly the ball that moved.
The whole wiring procedure may at first seem complicated and fraught
with danger, but in fact it has deviated little from the normal 4-ball
break. There are no difficult shots involved, and there are many opportunities
for adjustment if things go wrong. In particular, the attempt at a double
wire provides a 'safety net' - if one wiring is not achieved, you still
have the chance of the other. Try it out on the court, starting from the
position shown in Fig. 1. You will be surprised how quickly you get the
idea, especially if you take the bisques to complete the wiring. Practise
it. It makes your practice more interesting and improves the accuracy of
your break play.